from datasets import Dataset, DatasetDict
import json


def load_jsonl(file_path):
    data = []
    with open(file_path, "r", encoding="utf-8") as f:
        for line_num, line in enumerate(f, 1):
            line = line.strip()
            if not line:  # Skip empty lines
                continue
            try:
                # Try parsing the line
                data.append(json.loads(line))
            except json.JSONDecodeError as e:
                print(f"Warning: Error parsing line {line_num}: {e}")
                print(f"Problematic line: {line[:200]}...")
    return data


def create_hf_dataset(train_file, val_file, test_file):
    # Load the data
    train_data = load_jsonl(train_file)
    val_data = load_jsonl(val_file)
    test_data = load_jsonl(test_file)

    # Create datasets
    train_dataset = Dataset.from_list(train_data)
    val_dataset = Dataset.from_list(val_data)
    test_dataset = Dataset.from_list(test_data)

    # Combine into DatasetDict
    dataset_dict = DatasetDict(
        {
            "train": train_dataset,
            "validation": val_dataset,
            "test": test_dataset,
        }
    )

    return dataset_dict


# Create and validate the dataset is ready to upload
dataset = create_hf_dataset(TRAIN_FILE, VALIDATION_FILE, TEST_FILE)
print(f"Train samples: {len(dataset['train'])}")
print(f"Validation samples: {len(dataset['validation'])}")
print(f"Test samples: {len(dataset['test'])}")
print(f"\nSample entry: {dataset['train'][0]}")Module 7: Increasing Model Accuracy (Part 2)
Recap
- Understood what leads to hallucinations in models, how models are evaluated, and an overview of techniques to increase accuracy
- Explored prompt engineering and thinking models
- Introduced and implemented Text-to-SQL and RAG (Retrieval-Augmented Generation) to increase the accuracy of a limited SLM
- Started exploring model fine-tuning
- Generated synthetic data for fine-tuning a small language model
Lesson Objectives
- Use your generated synthetic data to fine-tune an SLM using QLoRA
- Use W&B (Weights & Biases) to observe metrics during the training run
- Post-training, test and evaluate the accuracy of your fine-tuned model
- Merge, quantize, and upload your model to Hugging Face to share with others
- Create a model card for your newly fine-tuned model
Model Training Stages
Model Training Stages
- There are three main stages of training a model:
- Pretraining: The initial, large-scale training run that creates a base model with pretrained weights
- Supervised Fine-Tuning (SFT): Shapes the base model to follow instructions and respond in a desired style or format
- Alignment: Further refines the model toward preferred behaviors and values
Model Training Stages

Model Training Stages
- Many models (e.g., Qwen3-1.7B) have already gone through these three stages
- We will be adding a fourth stage. An SFT of an existing “polished” model
- Why?
- The model already knows how to follow instructions, answer questions, etc.
- They need far less training data to get good results
- Training tends to be faster and more stable since they are starting from a good baseline
Model Training Stages

Supervised Fine-Tuning (SFT)
Supervised Fine-Tuning (SFT)
- How does SFT work?
- Build training and validation datasets (we did this already!)
- Feed the prompts into the model and compare the desired output tokens with the model’s predictions
- The difference between the two is known as the training loss
Supervised Fine-Tuning (SFT)
- How does SFT work?
- Back propagate through the model, nudging the weights to guide toward the desired output
- This “nudging” is done using an optimizer (typically AdamW)
- Repeat for typically 1-3 epochs (epoch = complete pass through the dataset)
- Monitor validation loss and checkpoint the model at regular intervals
Supervised Fine-Tuning (SFT)

Supervised Fine-Tuning (SFT)

Supervised Fine-Tuning (SFT)
- Training Loss tells us how close the model predicts vs. our desired outputs
- Validation Loss tells us how well the model predicts on data that it hasn’t been trained on
- Prevents the model from memorizing the training data vs. generalizing
- “Memorizing training data” known as overfitting
Introducing LoRA
- Adjusting all parameters in a model can be compute and memory intensive
- Introducing LoRA: Low-Rank Adaptation of Large Language Models (Hu et al. 2021)
Introducing LoRA
- How LoRA works:
- The model’s base weights (W) are frozen (never updated) during training
- Two small matrices (A and B) are introduced, whose product represents the desired change to W
- Only A and B are updated during training — a tiny fraction of the total parameters
- After training, these matrices are known as an “adapter”
- The adapter can be kept separate (swappable) or merged back into W to create a new, standalone model
Introducing LoRA

Introducing QLoRA
- To further increase memory efficiency, we will use QLoRA (Quantized LoRA)
- Introducing QLoRA: Efficient Finetuning of Quantized LLMs (Dettmers et al. 2023)
- The base model weights (W) are quantized to 4-bit (NF4 format) for storage
- During the forward pass, W is dequantized to bf16 on the fly for computation, then discarded
- Adapter matrices A and B are kept at full precision (bf16) for training accuracy
Introducing QLoRA

Our Fine-Tuning Plan
Our Fine-Tuning Plan (1/2)
- Upload our .jsonl files to Hugging Face to create a dataset
- In our training notebook…
- Download the dataset
- Format our training data to match the chat template
- i.e., convert JSON to
<|imstart|>user... etc.
- i.e., convert JSON to
- Start our training run!
- Use W&B (Weights & Biases) to monitor how well our model is learning
- Training loss and validation loss
Our Fine-Tuning Plan (2/2)
- After training has completed…
- Test (both manually and automatic)
- Assuming things went well…
- Merge and upload our model to Hugging Face
- Quantize our model (create a GGUF) and upload to Hugging Face
- Download and test our model in LM Studio
- Phew!
Upload Training Files
Upload Training Files
- Upload our
train.jsonl,validation.jsonl, andtest.jsonlfiles to a Hugging Face Dataset - Why do this?
- Single repository
- Easy to hook into training libraries
- Shareable with others
- Better UI and query semantics vs. raw .jsonl files
Upload Training Files
Upload Training Files
Demo
Uploading the training data files to Hugging Face Dataset
Upload Training Files
- After you’ve uploaded
- It will take a few minutes before you can browse your data
- About 24-48 hours, you will likely receive an email about conversion to parquet format
Hands-on
Upload your training data files to Hugging Face Dataset
(CPU instance on Colab is fine for this)
The Training Notebook
The Training Notebook
train-cuda.ipynbcontains the steps to fine-tune a small model- Main sections
- Set training parameters
- Download datasets from Hugging Face
- Create formatted dataset that uses the chat template
- Load base model and configure for QLoRA
- Create our trainer
- Train!
Demo
Walkthrough of the training notebook
Set parameters and start training!
Sidebar: How long will training take?
- For Qwen3-1.7B using an A100 on Colab
- About 45 mins
- (20 mins if we are lucky and get upgraded to an RTX6000)
- We can monitor using
tqdm(a popular Python progress bar)
Training Hyperparameters
Training Hyperparameters
BATCH_SIZE = 4
- Number of training examples processed together in a single forward/backward pass
- Larger batches = more stable gradient estimates, but consume more memory
- 2-8 recommended
Training Hyperparameters
GRADIENT_ACCUMULATION_STEPS = 4
- Instead of updating weights after every batch, accumulate over this many batches before taking an optimizer step
- Memory-efficient way to increase the batch size
- 2-16 recommended
Training Hyperparameters
LEARNING_RATE = 2e-4 (or 0.0002)
- How large a step the optimizer takes when updating weights
- Too high = training becomes unstable
- Too low = training is too slow or gets stuck
- 1e-4 or 2e-4 are common starting points
Training Hyperparameters
NUM_EPOCHS = 3
- Number of times the model sees the entire dataset
- More epochs can improve training, but with the risk of overfitting
- 2-5 epochs for a few thousand examples recommended
Training Hyperparameters
MAX_SEQ_LENGTH = 512
- The maximum number of tokens in a single training example
- (Length of one of the lines in your jsonl file)
- Should cover your longest examples without too much padding
Training Hyperparameters
LORA_R = 16
- The rank of the adapter matrices - i.e., how many parameters are added during fine-tuning
- Higher rank = more capacity, but also more memory and risk of overfitting
- e.g., 4096 x 4096 weight matrix = 16M parameters
- A = 4096x16; B=16x4096; Total = 131K parameters to be trained
- 4, 8, 16, 32 common values; 8-16 for small models
Training Hyperparameters
LORA_ALPHA = 32
- A scaling factor for the LoRA updates
- Usually set to 2x the rank (LORA_R)
Training Hyperparameters
LORA_DROPOUT = 0.05
- Randomly zero out a small fraction of the adapter activations during training
- Regularization technique to prevent overfitting
- 0.0 to 0.1 common range; use lower values for very small datasets
Training Hyperparameters
USE_4BIT = True
- Enables QLoRA by loading the base model weights (W) in 4-bit precision
- Optional for training 1B models in 8Gb VRAM
- Definitely needed for 7B and 13B fine-tuning runs
Demo
Let’s check on our training!
Weights & Biases
Weights & Biases
- What is Weights & Biases (W&B)?
- Founded in 2018 after founders noticed that researchers were keeping hyperparameters and training run details in spreadsheets / on paper, etc.
- Stream any metric (accuracy, loss, GPU utilization) to a single dashboard; compare training runs side-by-side to improve model accuracy
- Used either standalone via
wandb.log()calls and/or integrated into many training libraries - Generous free tier and education/researcher plans
Weights & Biases
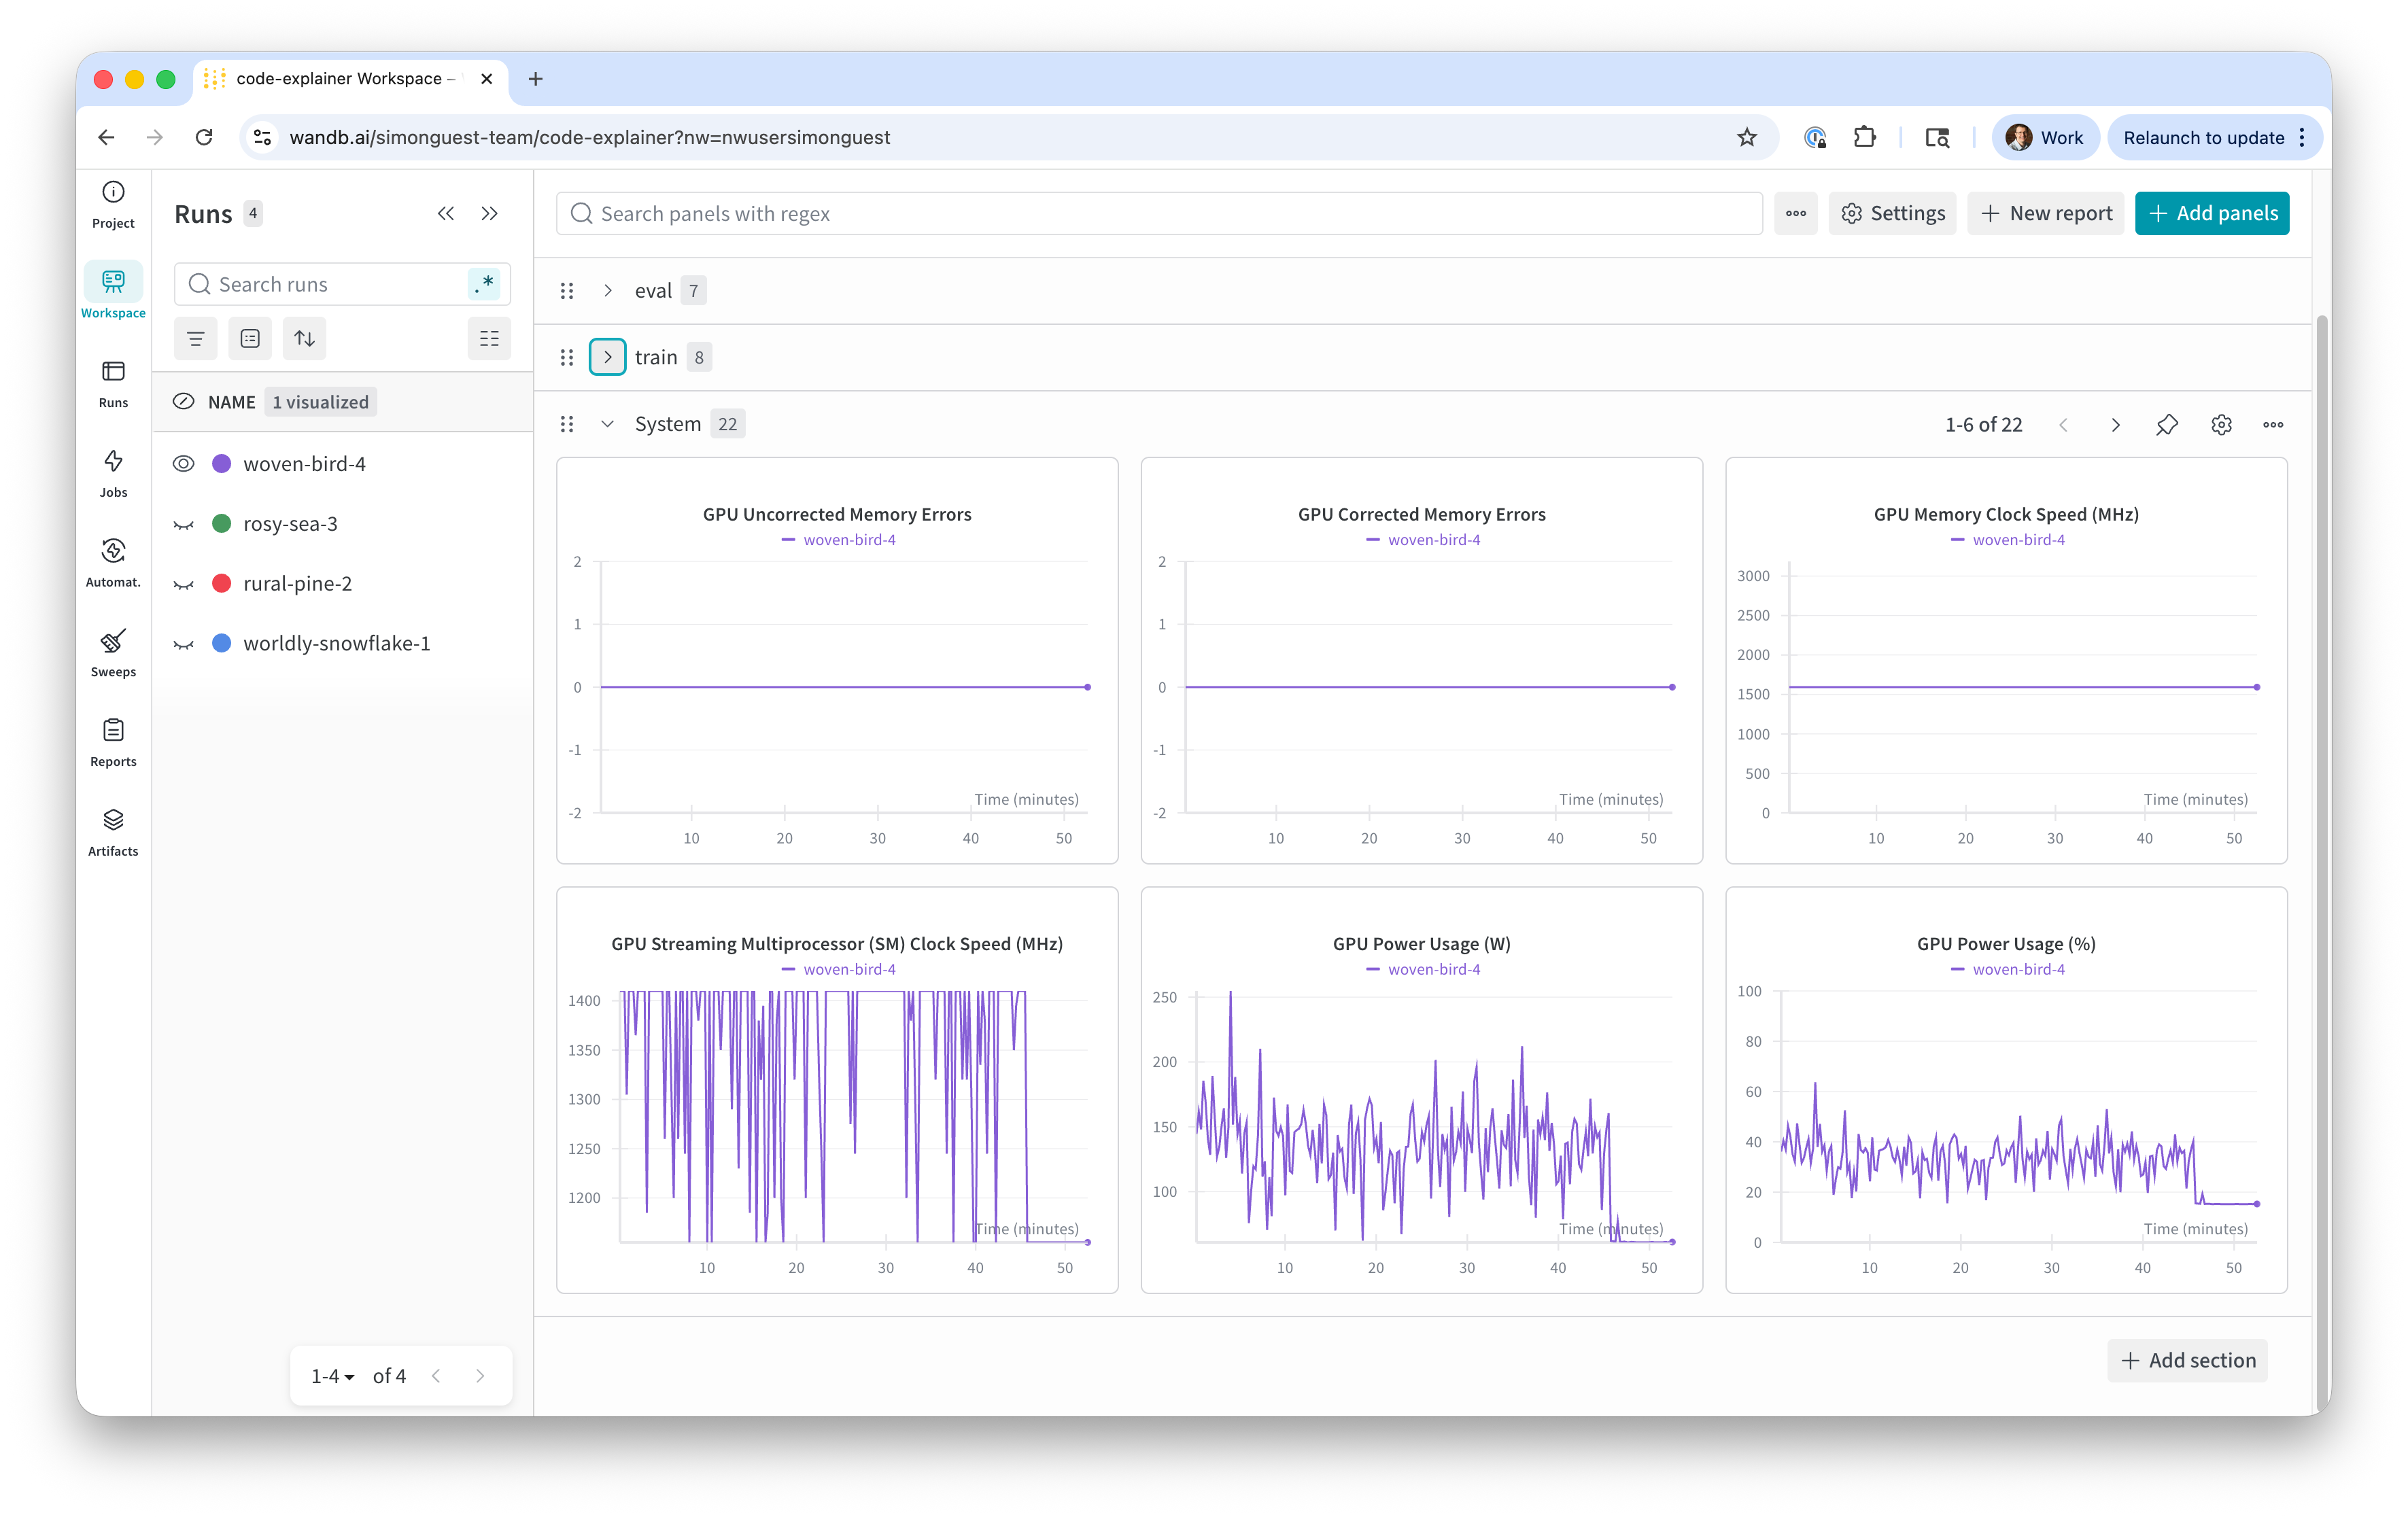
- System Metrics
- Metrics on the health of the underlying hardware used to train the model
- Provided automatically via the W&B library
- Useful for hardware capacity monitoring, especially if the training run crashes
- What to look for:
- Stability - i.e., not running out of VRAM, disk space, etc.
Weights & Biases
Weights & Biases
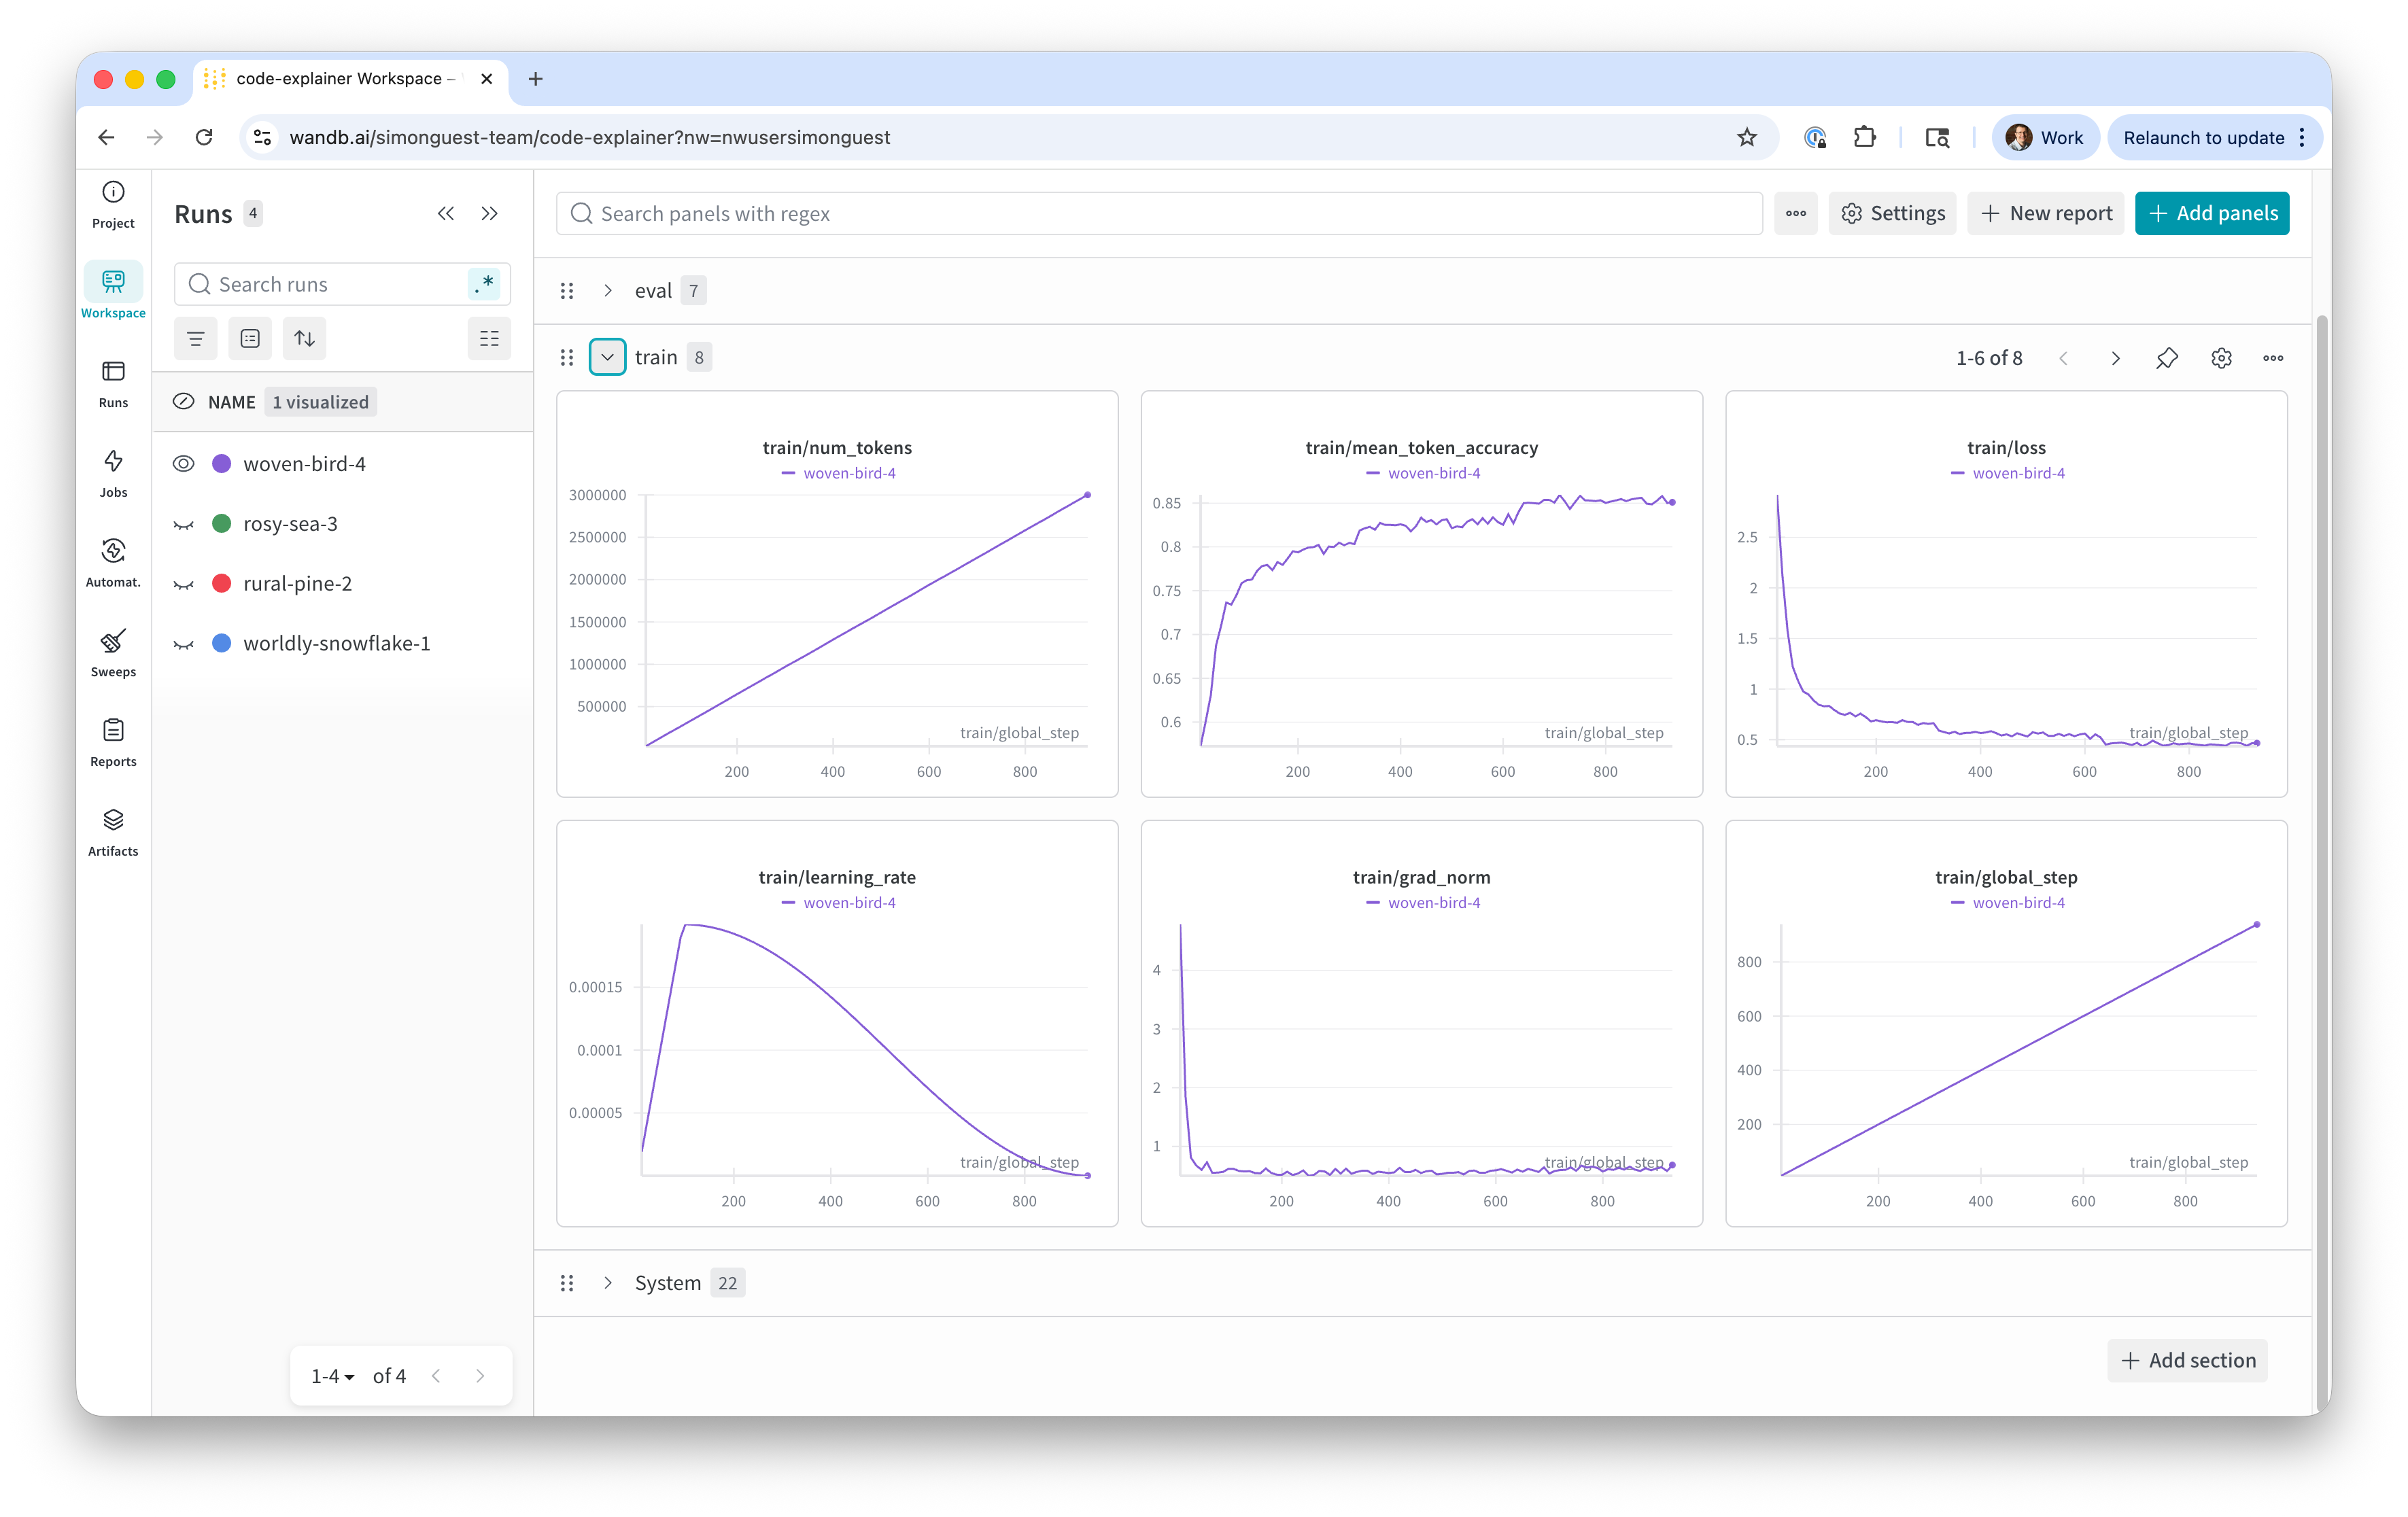
- Training Metrics
- Metrics on the performance of the training process (how accurate are the output tokens matching the training data)
- Number of tokens, token accuracy, training loss, grad_norm, etc.
- What to look for:
- Token accuracy should increase quickly and plateau
- Training loss should decrease quickly and plateau
- Grad norm should not have drastic spikes (e.g., to 100)
Weights & Biases
Weights & Biases
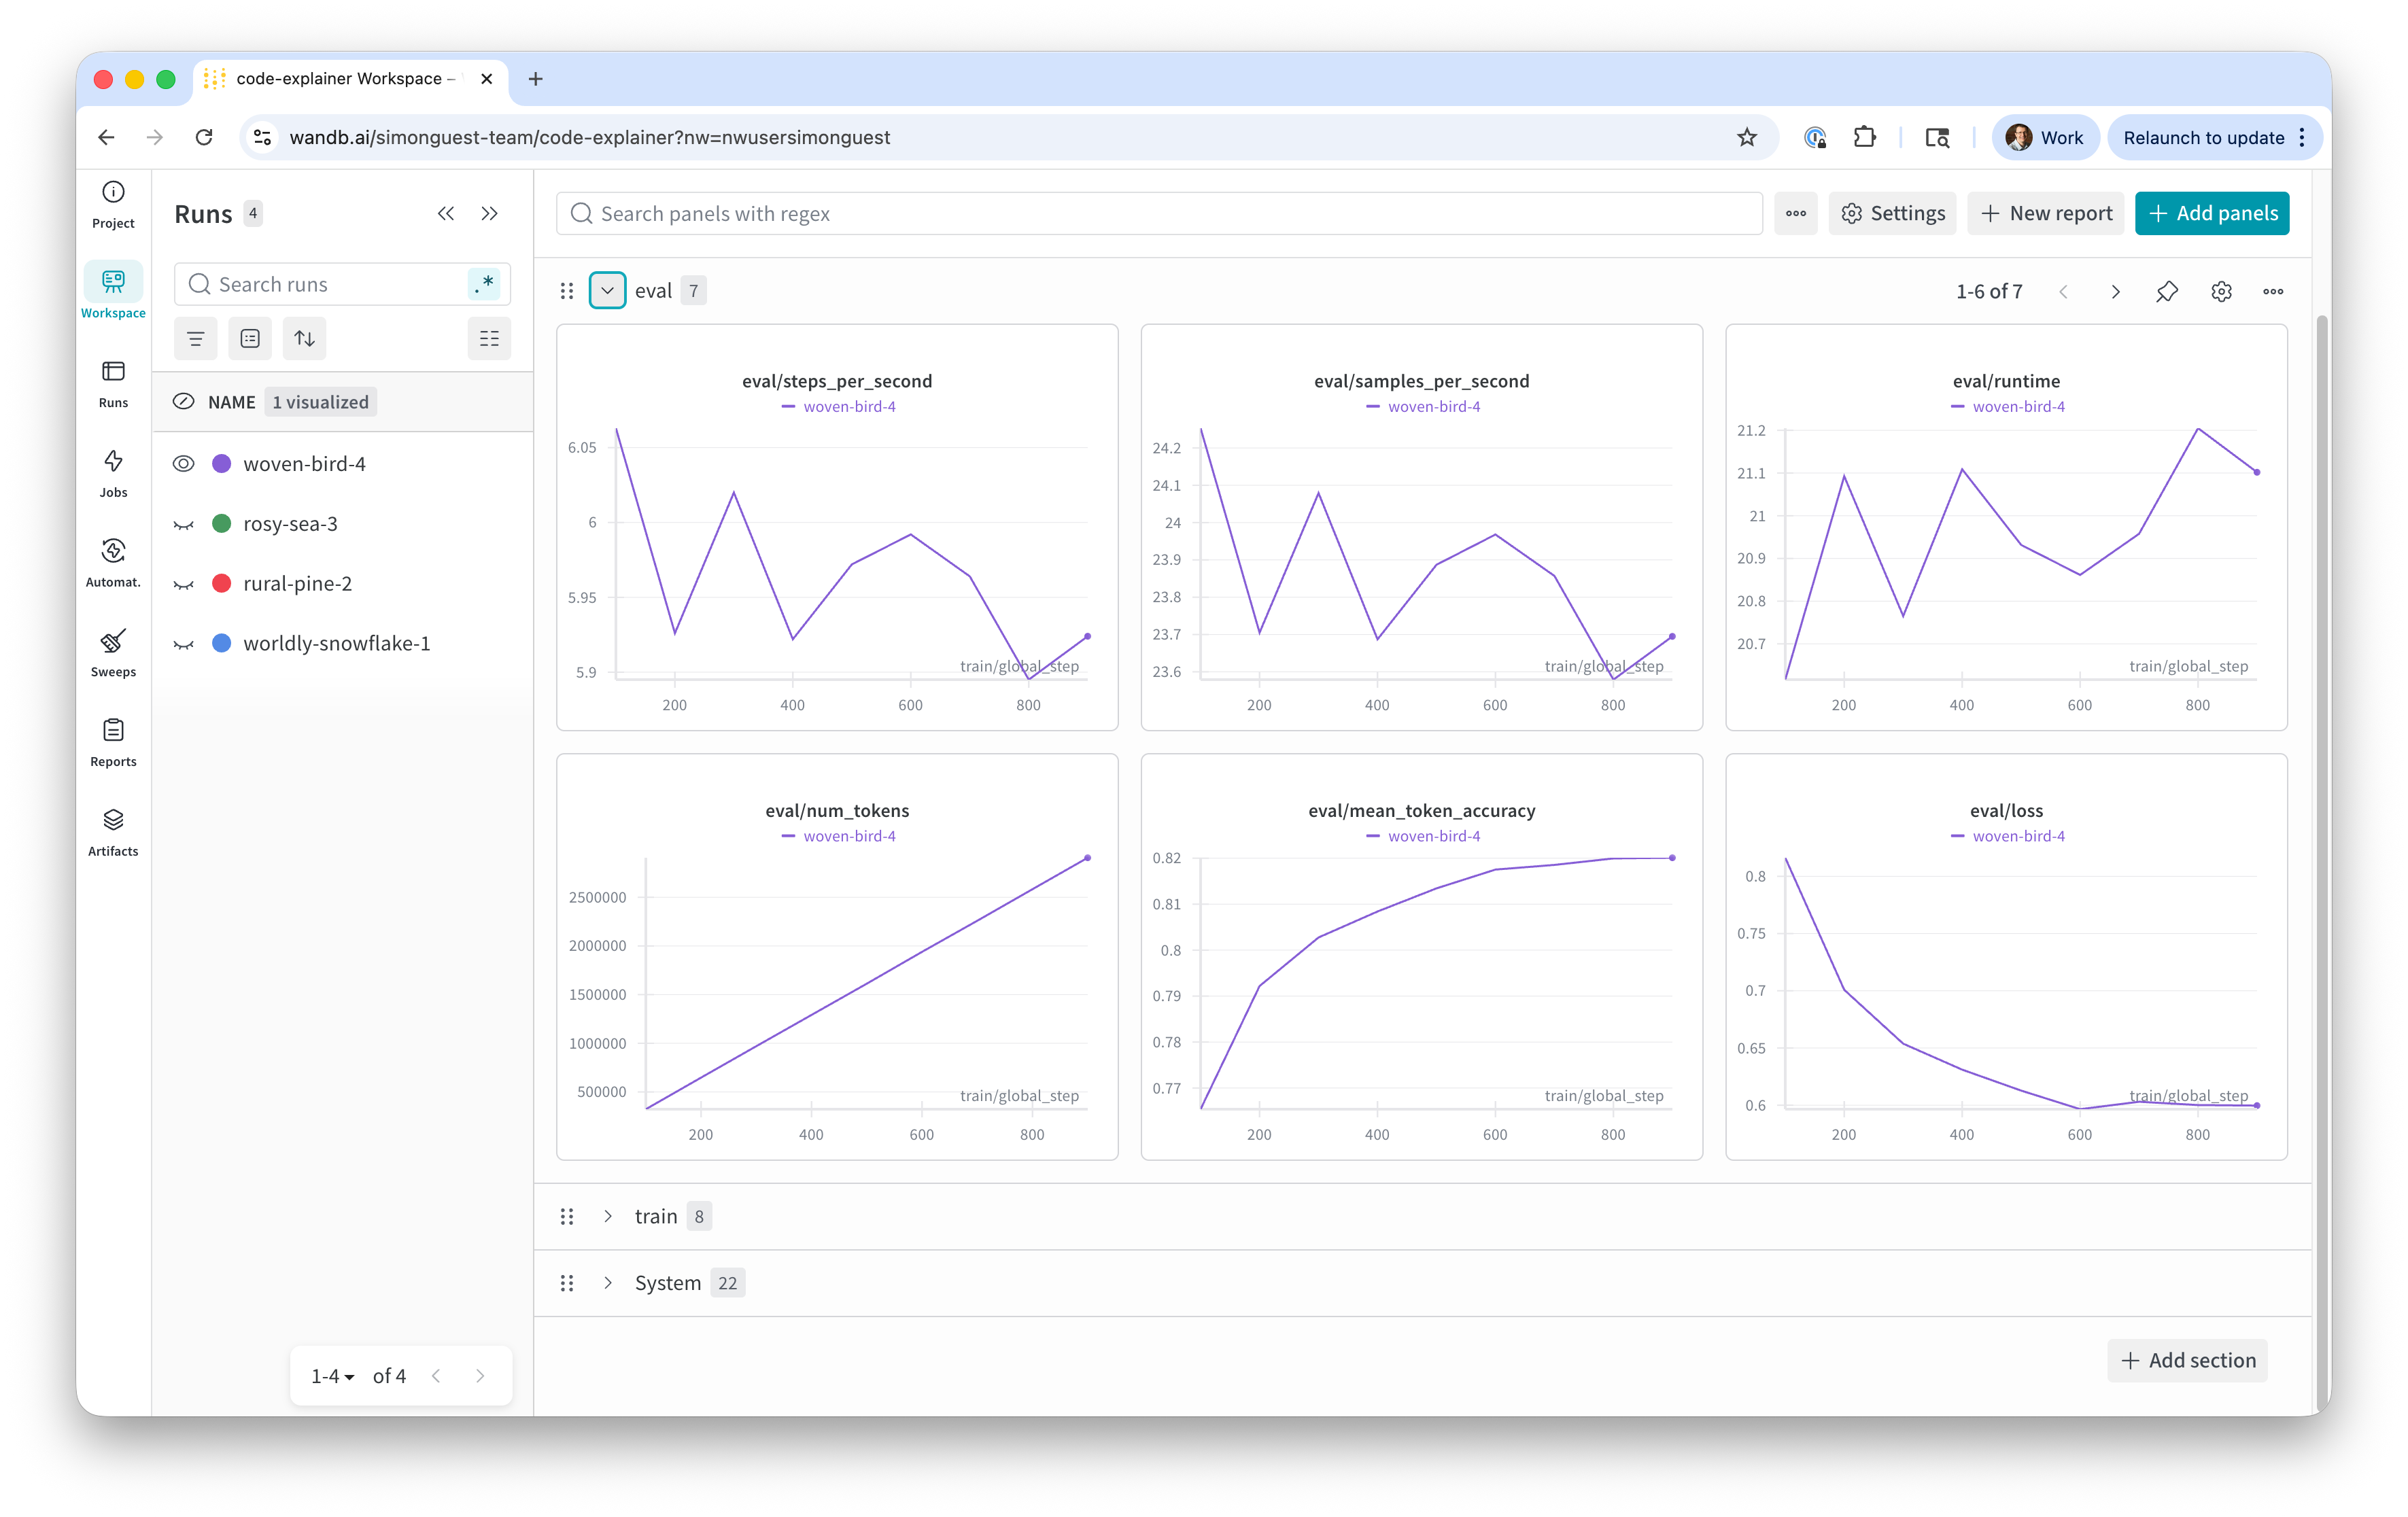
- Eval Metrics
- Metrics on the validation runs during training (predictions using the validation dataset)
- Number of tokens, token accuracy, eval loss (a.k.a. validation loss)
- What to look for:
- Validation loss should decrease quickly and plateau
- Validation loss should be very close to training loss
- Validation loss should not start to increase (indicates overfitting)
Weights & Biases
Demo
W&B output during current training run
Let’s Do This!
Create your W&B account (https://wandb.ai), download API key, set in Colab (WANDB_API_KEY)
Open train-cuda.ipynb in Colab, configure the training parameters in the “Model parameters” cell
Change runtype to A100 and start your training run!
Note: Run one cell at a time, not all!
Post-Training
Post-Training
- After training has completed:
- Test the model using a random input from our test dataset
- Create a model card, merge the models, and upload to Hugging Face
- Quantize the model and upload the GGUF to Hugging Face
- Download the GGUF in LM Studio!
Post-Training: Test
Post-Training: Create Model Card
- What’s a model card?
README.mdfor your model on Hugging Face- Common sections
- An overview of the model
- How the model was trained
- Benchmarks
- How to use the model
- Limitations, best practices, risks, safety, author details
Post-Training: Create Model Card
- A default
README.mdwill be generated bysave_pretrained()method - You can overwrite this with your own
- Or create one programmatically
Post-Training: Create Model Card
from huggingface_hub import ModelCard

card_content = f"""---
base_model: {BASE_MODEL}
tags:
- peft
- lora
- text-generation
---

# {MODEL_NAME}

## Model Description
Fine-tuned from `{BASE_MODEL}` using QLoRA (4-bit) with supervised fine-tuning.

## Training Details
- Dataset: `{DATASET_REPO}`
- LoRA rank: {LORA_R}, alpha: {LORA_ALPHA}
- Epochs: {NUM_EPOCHS}, Learning rate: {LEARNING_RATE}

## Intended Use

This model is a test model used for the CS-394/594 class at DigiPen.

The model is designed to provide a summary explanation of a snippet of Python code, to be used in an IDE. This model takes a snippet of code (passed as the user prompt) and returns a two paragraph explanation of what the code does, including an analogy that helps students better understand how the code functions.

## Limitations

This model is a single-turn model and has not been trained on support long, multi-turn conversations.
"""

card = ModelCard(card_content)
card.save(f"{MODEL_FOLDER}/lora/README.md")
Post-Training: Merge and Upload
- Merging “fuses” the LoRA adapter and base model, creating a new model
- Doing this will enable others to use your model
- Upload your merged model (and optionally your adapter in a sub-folder) to Hugging Face
Post-Training: Merge and Upload
import torch
from transformers import AutoModelForCausalLM, AutoTokenizer

from peft import PeftModel

# Load the configuration and model
base_model = AutoModelForCausalLM.from_pretrained(
    BASE_MODEL,
    device_map="auto",
    dtype=torch.bfloat16,
)
adapter_model = PeftModel.from_pretrained(base_model, f"{MODEL_FOLDER}/lora")

# Merge and save the model
merged_model = adapter_model.merge_and_unload() # type: ignore
merged_model.save_pretrained(f"{MODEL_FOLDER}/merged")
# Save the tokenizer
tokenizer = AutoTokenizer.from_pretrained(BASE_MODEL)
tokenizer.save_pretrained(f"{MODEL_FOLDER}/merged")

# Copy the model card to the merged folder
!cp {MODEL_FOLDER}/lora/README.md {MODEL_FOLDER}/merged/.
Post-Training: Merge and Upload
from huggingface_hub import HfApi, create_repo

# Set the MODEL_REPO
MODEL_REPO = f"{HF_USERNAME}/{MODEL_NAME}"

# Initialize the API
api = HfApi()

# Create the repository (if it doesn't exist)
try:
    create_repo(MODEL_REPO, repo_type="model", exist_ok=True, private=False)
    print(f"Repository {MODEL_REPO} created or already exists")
except Exception as e:
    print(f"Error creating repo: {e}")

# Upload merged model files to root (this is the main model)
print("\nUploading merged model to root...")
api.upload_folder(
    folder_path=f"{MODEL_FOLDER}/merged",
    repo_id=MODEL_REPO,
    repo_type="model",
    path_in_repo="",  # Empty string uploads to root
    commit_message="Upload merged model"
)

# Upload LoRA adapter to subfolder (optional but useful for reference)
print("\nUploading LoRA adapter...")
api.upload_folder(
    folder_path=f"{MODEL_FOLDER}/lora",
    repo_id=MODEL_REPO,
    repo_type="model",
    path_in_repo="lora_adapter",  # Keep adapter in subfolder
    commit_message="Upload LoRA adapter"
)

print(f"\n✓ All files uploaded successfully to https://huggingface.co/{MODEL_REPO}")
Demo
Create model card, merge, and upload to Hugging Face
Post-Training: Quantize
- Even though we used QLoRA, your merged model is still full precision
- To enable others to run locally, we want to create quantized versions (GGUF)
- Use llama-quantize (part of llama.cpp) to quantize
- Then upload to Hugging Face (in the root of the model repo so it’s discoverable)
Post-Training: Quantize
TEMP_FOLDER = "/content/tmp"

# Create a temporary location and clone llama.cpp
!mkdir -p {TEMP_FOLDER}
!cd {TEMP_FOLDER} && git clone https://github.com/ggml-org/llama.cpp

!cd {TEMP_FOLDER}/llama.cpp && cmake -B build
!cd {TEMP_FOLDER}/llama.cpp && cmake --build build --config Release --target llama-quantize -j 8
Post-Training: Quantize
from huggingface_hub import snapshot_download

HF_USERNAME = "simonguest" # Change this to your Hugging Face username
MODEL_NAME = "Qwen3-1.7B-code-explainer" # Change this to the repo of your merged model
MODEL_REPO = f"{HF_USERNAME}/{MODEL_NAME}"

# Working folders
MODEL_FOLDER = "/content/model"
GGUF_FOLDER = "/content/ggufs"

!mkdir -p {MODEL_FOLDER}
!mkdir -p {GGUF_FOLDER}

# Download the model from Hugging Face at full precision
snapshot_download(repo_id=MODEL_REPO, local_dir=f"{MODEL_FOLDER}", repo_type="model")

# Convert to GGUF (fp16 first)
!cd {TEMP_FOLDER}/llama.cpp && python convert_hf_to_gguf.py {MODEL_FOLDER} \
    --outfile {GGUF_FOLDER}/{MODEL_NAME}-F16.gguf \
    --outtype f16

# # Convert gp16 GGUF to Q4_K_M
!{TEMP_FOLDER}/llama.cpp/build/bin/llama-quantize {GGUF_FOLDER}/{MODEL_NAME}-F16.gguf \
    {GGUF_FOLDER}/{MODEL_NAME}-Q4_K_M.gguf \
    Q4_K_M
Post-Training: Quantize
from huggingface_hub import HfApi

# Initialize the API
api = HfApi()

# Upload GGUF files to root
print("\nUploading GGUF models to root...")
api.upload_folder(
    folder_path=f"{GGUF_FOLDER}",
    repo_id=MODEL_REPO,
    repo_type="model",
    path_in_repo="",  # GGUF files are typically found on the root level of a HF repo
    commit_message="Upload GGUF quantized models"
)

print(f"\nGGUFs uploaded successfully to https://huggingface.co/{MODEL_REPO}")
Demo
Quantize and upload to Hugging Face
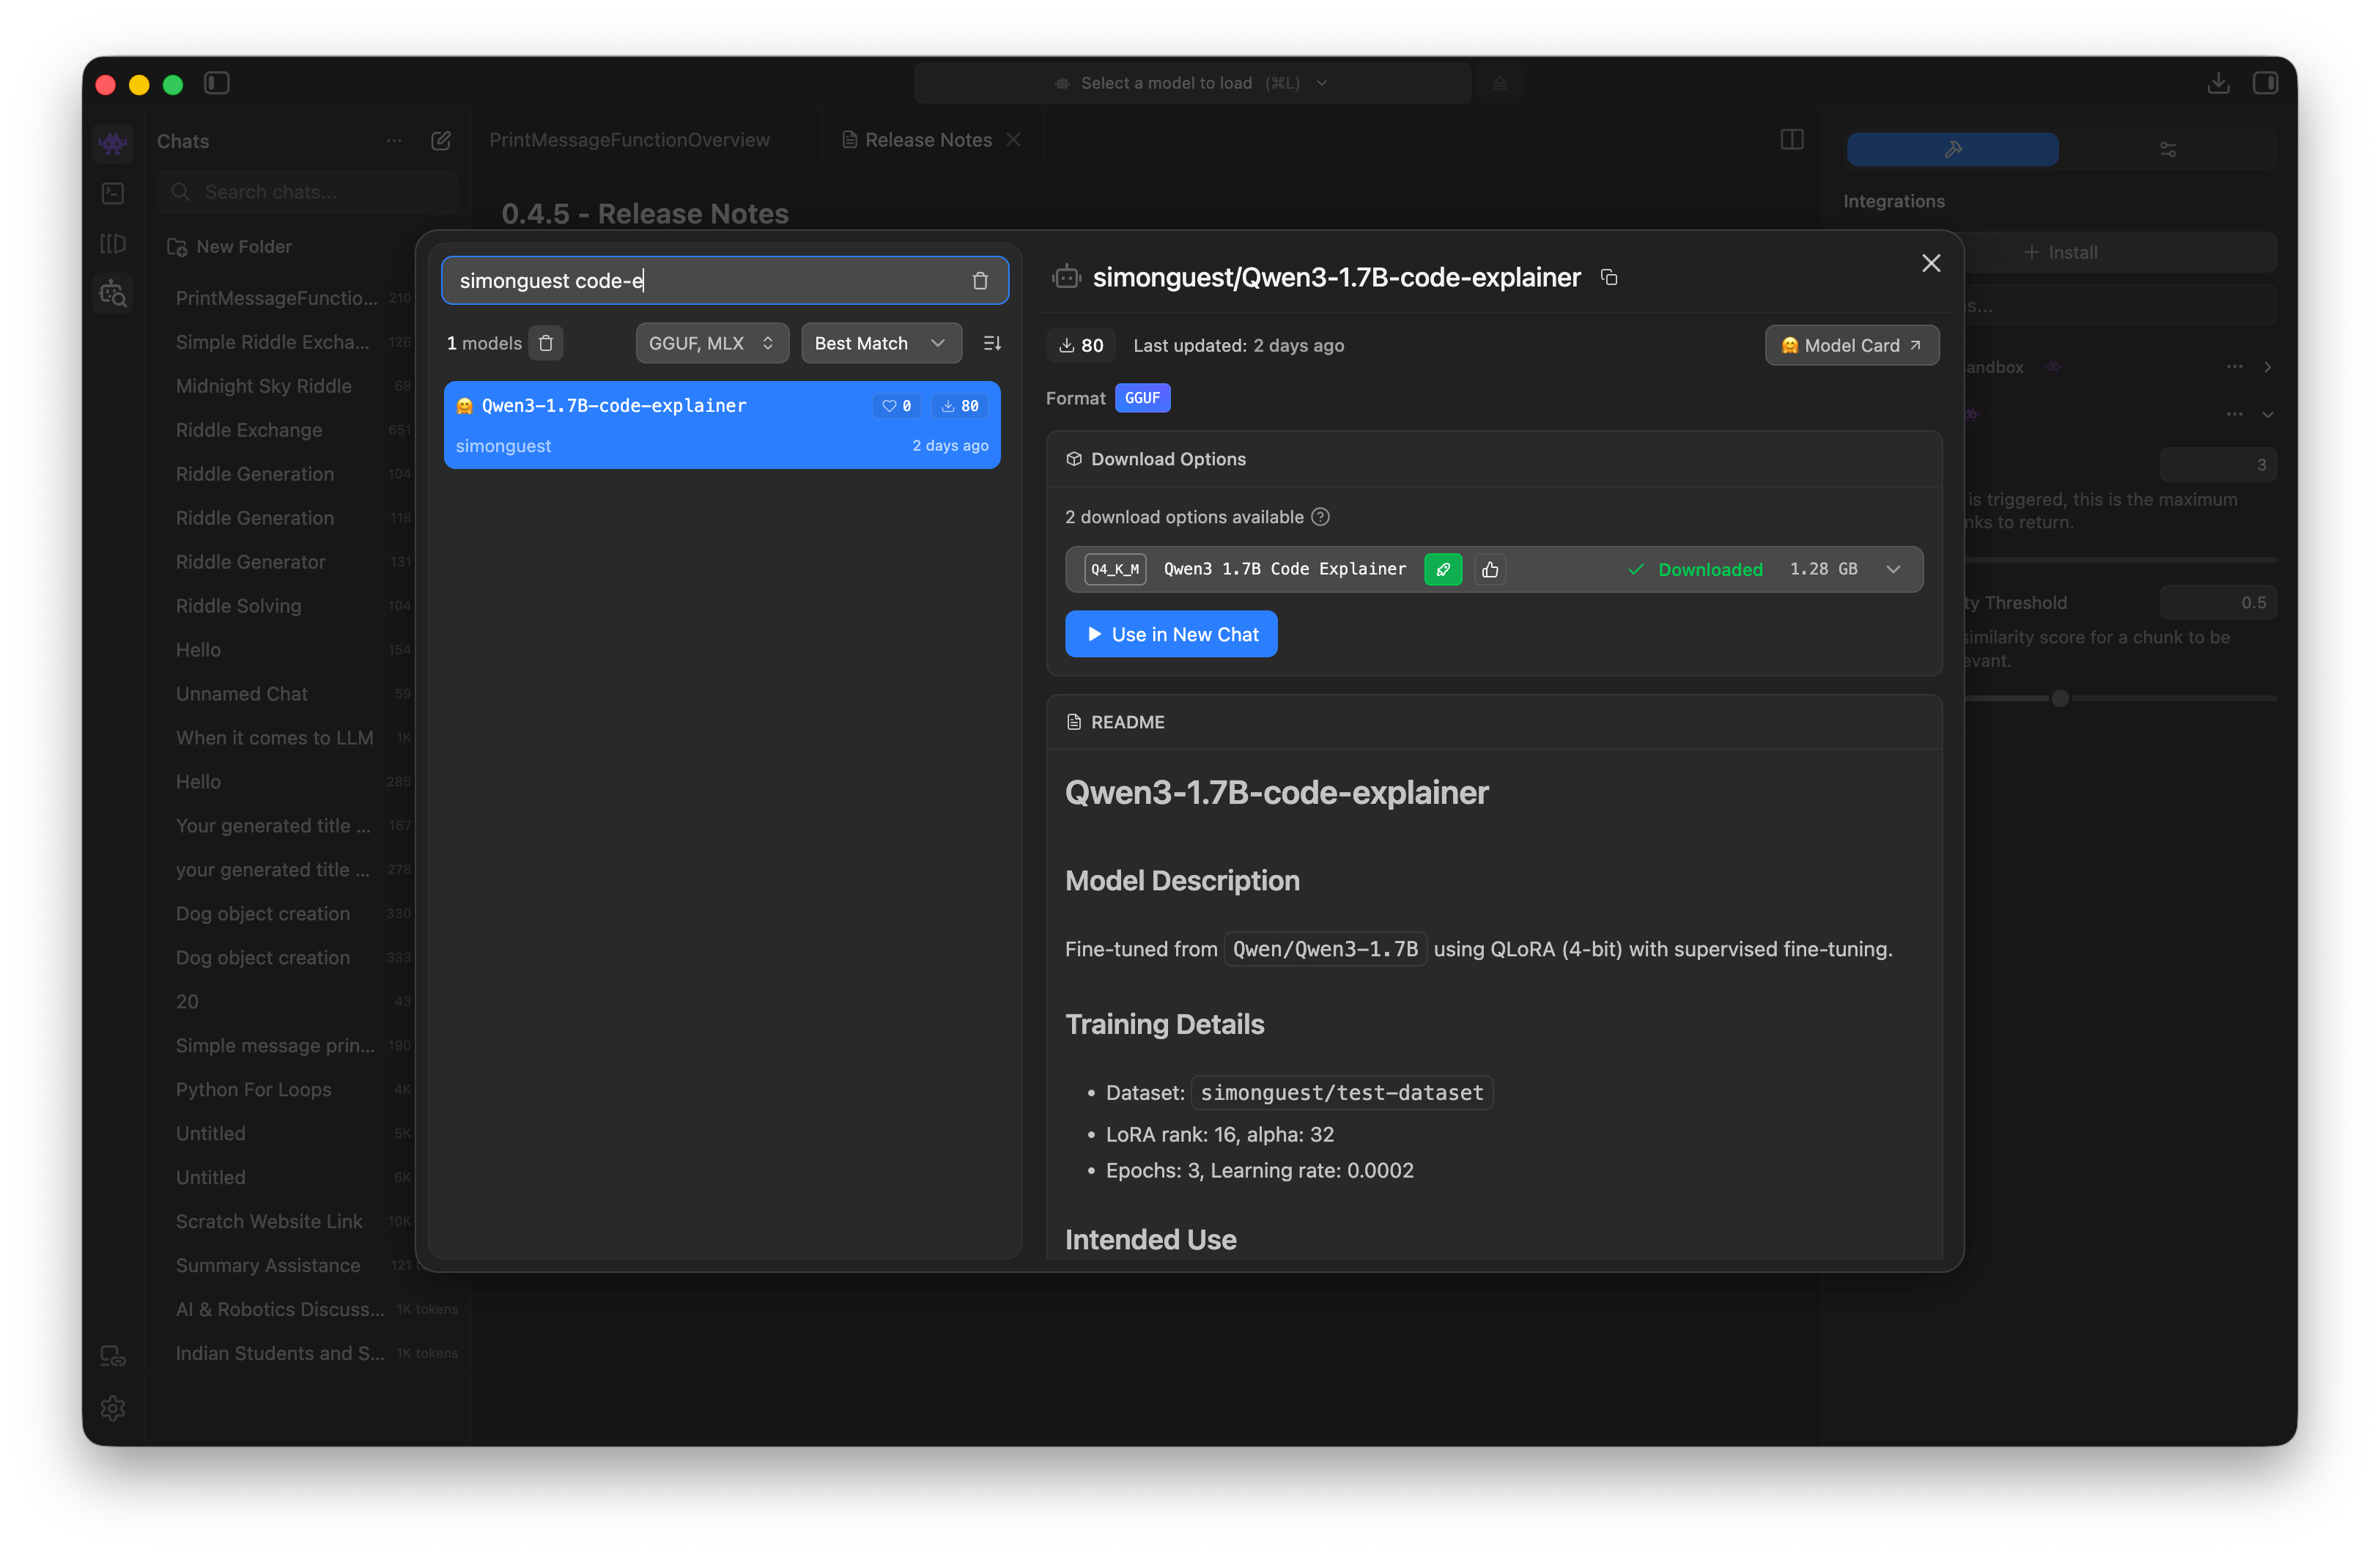
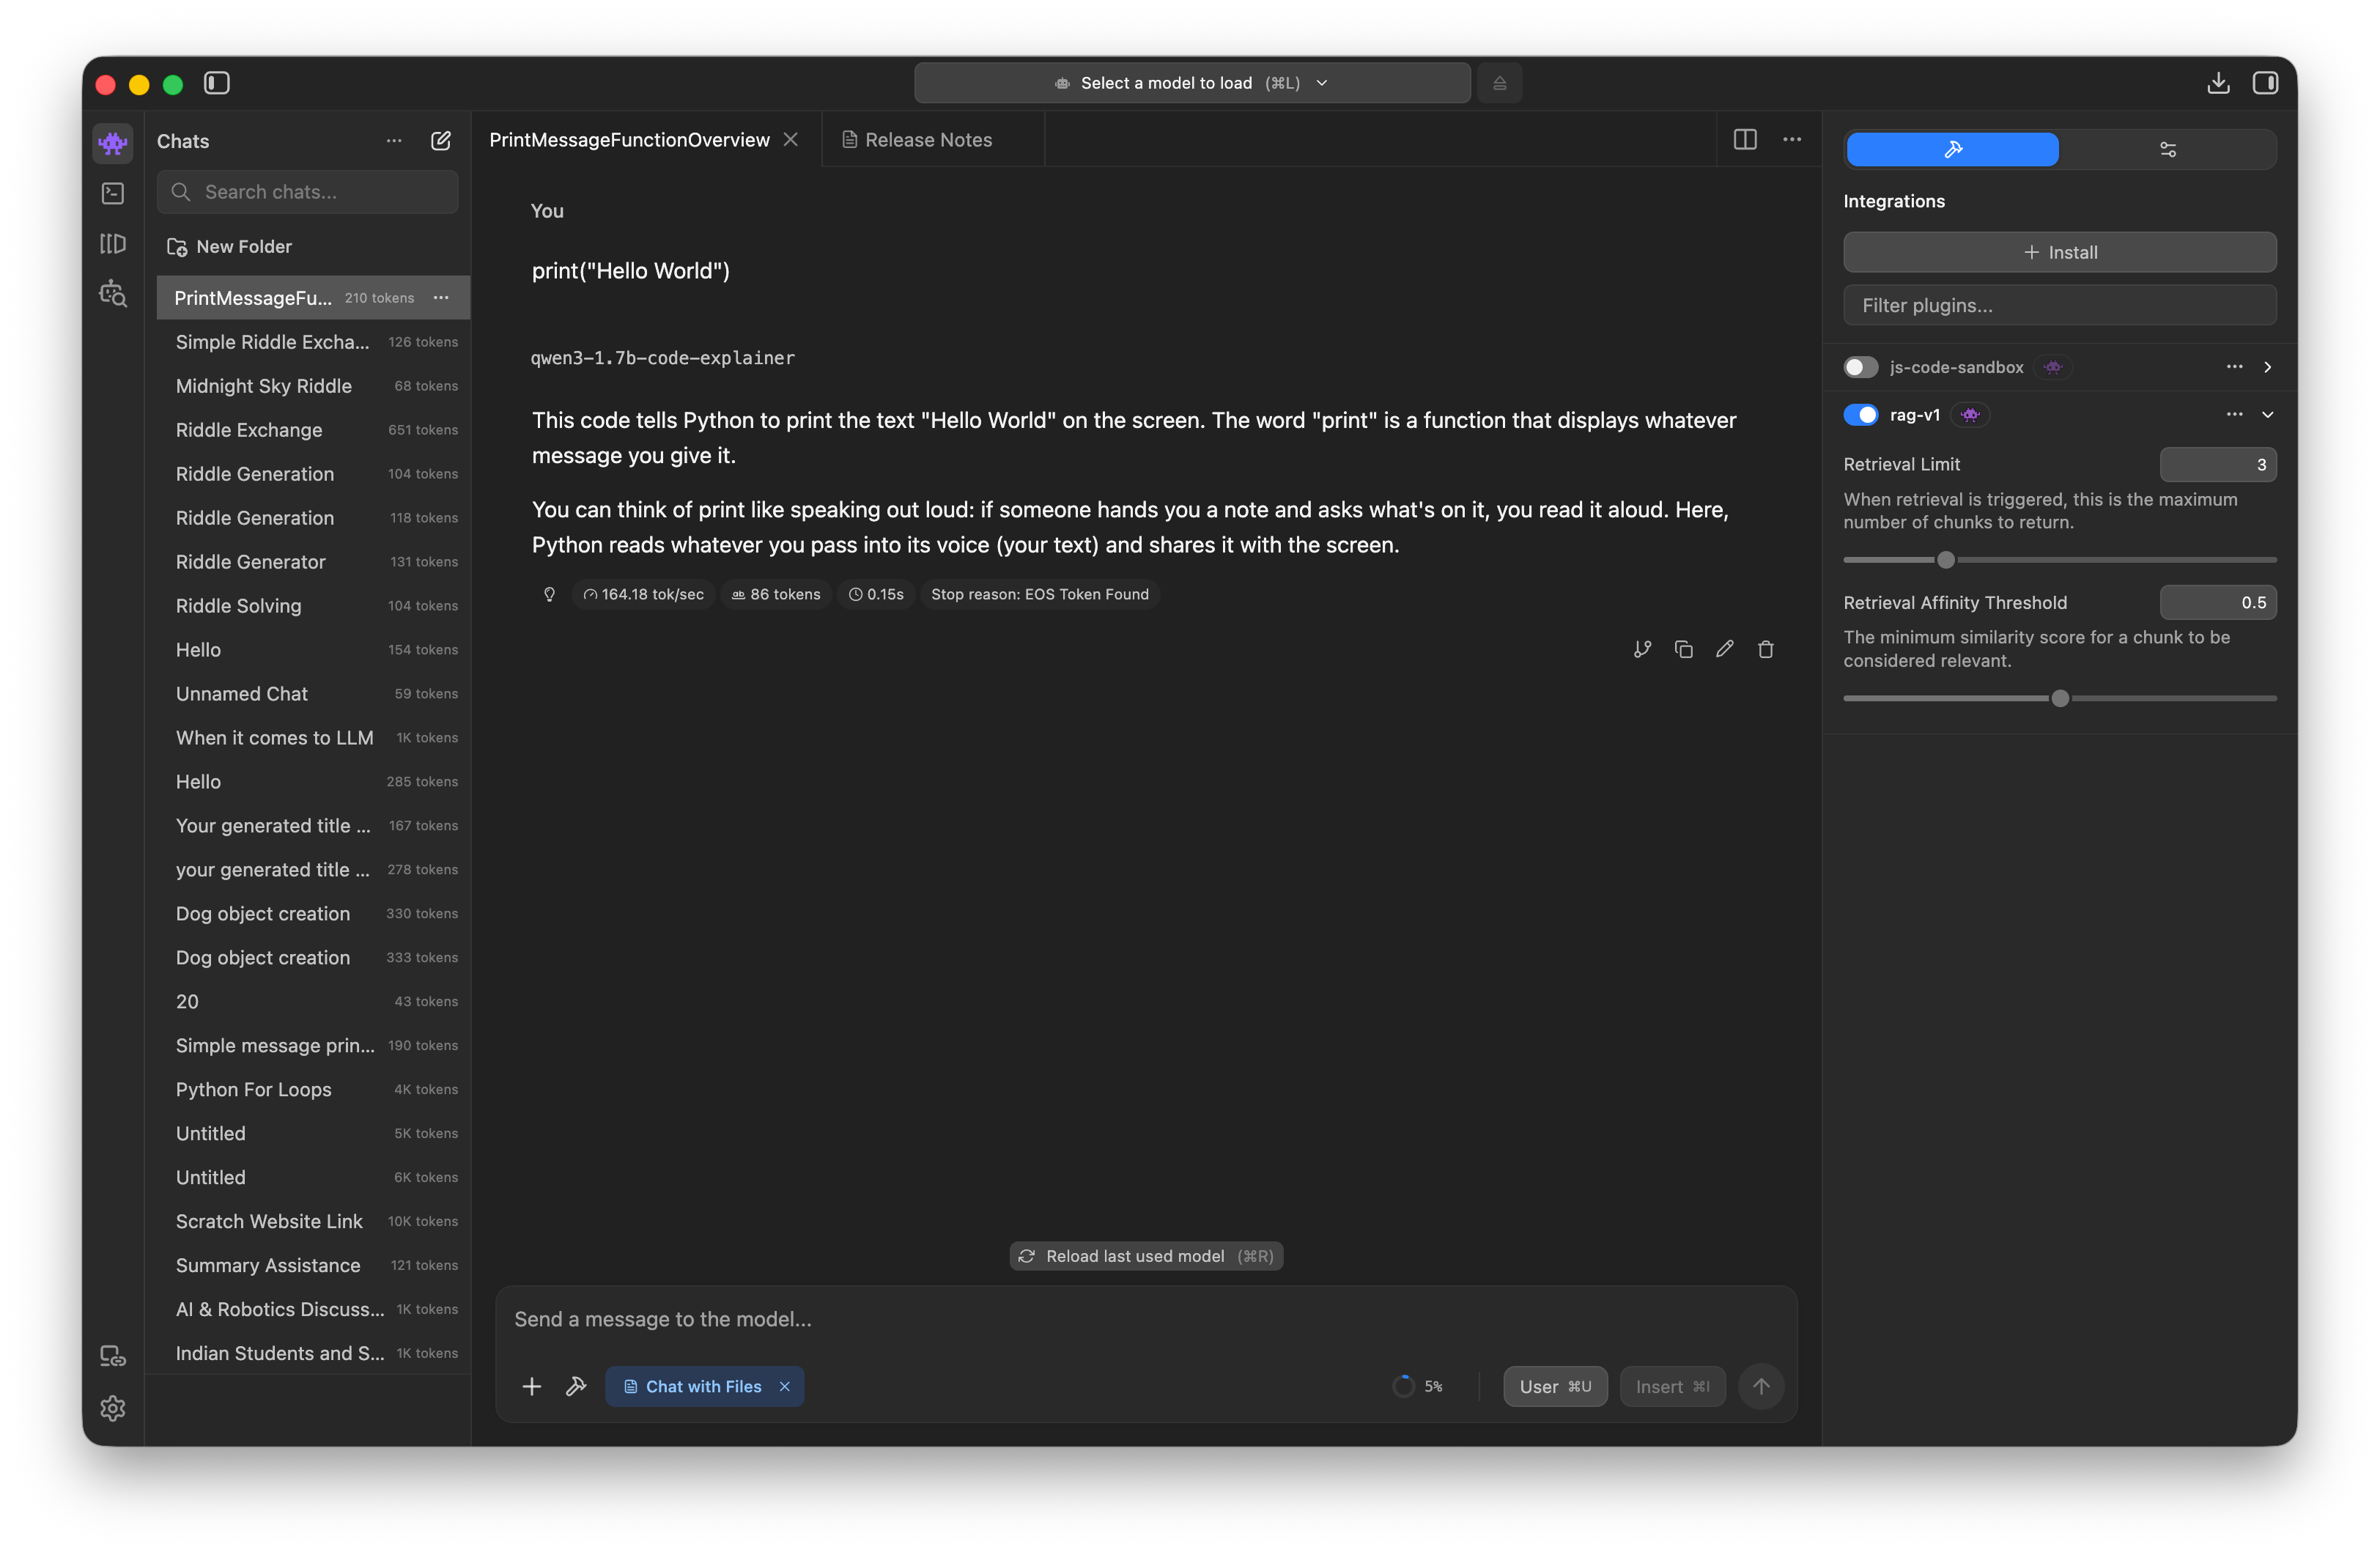
Post-Training: Use in LM Studio!
- Use LM Studio, search for your Hugging Face username
- Download and test the GGUF of your newly fine-tuned model
- (Don’t forget to turn off your A100 Colab instance, if you haven’t already!)
Post-Training: Use in LM Studio!
Post-Training: Use in LM Studio!
Demo
Search and chat in LM Studio!
Looking Ahead
Looking Ahead
- This week’s assignment!
- Our last lecture before spring break and final project!
- Discuss ethical, IP, and safety concerns for Generative AI
- Use an evidence-based approach for each of the areas
References
References
Dettmers, Tim, Artidoro Pagnoni, Ari Holtzman, and Luke Zettlemoyer. 2023. “QLoRA: Efficient Finetuning of Quantized LLMs.” Advances in Neural Information Processing Systems 36. https://arxiv.org/abs/2305.14314.
Hu, Edward J., Yelong Shen, Phillip Wallis, Zeyuan Allen-Zhu, Yuanzhi Li, Shean Wang, Lu Wang, and Weizhu Chen. 2021. “LoRA: Low-Rank Adaptation of Large Language Models.” arXiv Preprint arXiv:2106.09685. https://arxiv.org/abs/2106.09685.